Snow Day Donuts

I’m not one for keeping up with traditions.  I try, I really do.  I love traditions, especially family ones.  It just seems to me it was much easier to keep family traditions when it fell on the shoulders of my parents.  Our family has evolved over the years, as I am sure it is with most.  A few things have stuck…Christmas Eve Open House,  Mom’s Blueberry Cobbler, and Snow Day Donuts.

What?  You don’t know what Snow Day Donuts are?  Well, they are donuts made on snow days.  It is the oldest and probably dearest tradition (at least to my one daughter) that we have held on to.  Thirty-three years ago, my then 3-yr old daughter and I were snowed in for several days.  I, being very unprepared for such an event, had nothing in the house to make a proper meal.  On the other hand, I had plenty of flour, sugar, butter, eggs, etc.  Trying to figure out how to feed us for the duration, I came upon a simple recipe to make donuts.  Which is what I did – and we ate them for three days as if it were the most normal thing in the world to do! (There were a few perks to single-motherhood)

After that winter, my daughter expected donuts on snow days.  I never made them any other time, so it sort of fell into a tradition.  My girls are grown now, but I still make donuts on at least one snow day each winter.  A few years ago, I offered to extend the tradition to my next door neighbors, and well, a funny feuding banter now goes along with the annual tradition.  It seems as if my adult daughter (the original donut eater) didn’t like sharing her mother, or her donuts with the family next door!  With a little Facebook exposure, the faux feud is now public.

Tomorrow is going to be a snow day and I have already prepared the dough.  Taunts and threats have been made.  Now the race is on to see who gets to my door to pick up their donuts first.  I predict there will be enough for them, and a few of my new neighbors as well.

If you’d like the recipe, I found it online here.

PS.
I made the donuts today and I have a few observations…

  • the recipe is very easy, and very good
  • stick to the 8 hours or overnight…the donuts I made in the morning were much better than the ones I made later in the day
  • be sure to give the donuts a good rise time of at least an hour – do not put them in an overly warm area
  • the better you control the oil temperature, the better your donuts will turn out
  • the donuts are best eaten fresh

Diner favs, kitchen staples, and leftovers!

Do you have a favorite diner food?  Meatloaf?  Chicken fried steak? Omelettes?  Well, my all-time favorite diner food is Chicken Croquettes!  It’s what I usually order whenever I eat at a diner.  It’s not always good, though.  Some diners are certainly better than others with this menu item.  I hate when they are dry and tasteless.  Funny thing is, I have never attempted to make these at home.  I think I heard somewhere that they were difficult to make and so I just never bothered.

I learned a long time ago that there are certain things that need to be kept in my pantry.  Things that help make a meal out of basics – perfect for those nights when I don’t have time to shop or frankly, don’t feel like it.  My list of staples include flour, sugar, cream of chicken soup, bread crumbs, chocolate chips, cinnamon and dried minced onions.  Don’t misunderstand, I don’t use all of these together, but I often fall back on them.

What gets leftover in your fridge the most?  For me, it seems to be chicken.  I always make too much and because it’s just my daughter and I living together, it gets a little boring eating the same leftovers for days on end.  We can never finish it up before it expires.  I hate throwing away food, and yet I never know what to do with it.

If you’re still following along with this fractured story, I’ll pull it all together right here.  I came across a recipe for Chicken Croquettes that claimed to be simple.  Of course, I happened upon this today, after a long morning of baking and cleaning.  I’m exhausted so the “simple” claim was appealing.  The thought of shopping for ingredients was not.  Luckily, my pantry staples came in handy, and I even had leftover chicken and celery in the fridge.  I don’t know what excited me more…the thought of eating Chicken Croquettes or the fact that I wasn’t going to be throwing away all of that chicken!

I gathered the ingredients and began the preparation.  The chicken went into my Ninja Chopper (love that thing!)  I had enough chicken to double the recipe, so I did. (see what I mean about making too much?)  My plan was to make these and then freeze the extras for another time.  Basically, everything went into a bowl and was mixed with my hands.  I formed 12 patties and put them in the fridge to firm up.  When it was time for dinner, I coated them with bread crumbs and browned them in a pan.  I made the sauce as per the recipe and served them with applesauce and mashed potatoes (just like at the diner).  Yes, it was simple – and delicious.  Here’s the recipe:

This slideshow requires JavaScript.

Ingredients

1 (10.75 ounce) can condensed cream of chicken soup


1 1/2 cups finely chopped, cooked chicken meat


1/4 cup Italian-style dry bread crumbs


2 tablespoons minced celery


1 tablespoon minced onion

1/4 teaspoon poultry seasoning

1 tablespoon shortening

1/2 cup milk

1/8 tablespoon poultry seasoning

1/2 cup Italian-style dry bread crumbs, for rolling

Directions

  • Combine 1/3 cup of the soup, chicken, bread crumbs, celery, onion and 1/4 teaspoon poultry seasoning. Mix well and shape into 6 croquettes (I make patties). Chill in refrigerator for about 1 hour.
  • Remove croquettes from refrigerator and roll in additional bread crumbs. In a large skillet, melt 1 to 2 tablespoons shortening. Brown the croquettes in the shortening. Meanwhile, in a small saucepan, combine the remaining soup, milk and 1/8 teaspoon poultry seasoning. Heat over low, stirring occasionally. Serve sauce over croquettes.

{This recipe can be found at Allrecipes)

Tomorrow Night’s Dinner is As Good As Done!

I’m a lazy cook.  In fact I don’t cook a lot.  When I do, I make more than we need and we eat leftovers.  Needless to say, I LOVE MY CROCKPOT!!!  I, in fact own 3 crockpots of varying sizes, and a 22 quart counter top oven that is also a slow cooker.  I am the “Tim the Tool-man Taylor” of kitchen gadgets.  Actually, the crockpot collection stems from a lot of entertaining.

Today, I just couldn’t get my act together.  I had so much to do, but once I arrived at church and found the company of my friends, I was in no rush to get anything done.  I was planning on making red gravy and taco soup in my slow cookers, but it turned out that the recipes called for 8 hrs of cooking time.  I managed to buy the ingredients and I plan to make the soup tomorrow and the gravy on Tuesday.

The soup, I decided, could be prepared tonight and put in the fridge until morning.  The most difficult part (and it wasn’t difficult) was cutting up the onion and browning the ground beef.  The rest was done with a can opener.  Everything into the crock – and voila! dinner is done…well, I will have to put it into the cooker in the morning.

Here’s the recipe if you’re thinking of being lazy one day this week:

TACO SOUP

  • 1 lb ground beef
  • 1 medium onion, chopped
  • 1 (16 oz) can chili beans, with liquid
  • 1 (15 oz) can kidney beans, with liquid
  • 1 (15 oz) can whole kernel corn, with liquid
  • 1 (8 oz) can tomato sauce
  • 2 cups water
  • 2 (14.5 oz) cans peeled and diced tomatoes
  • 1 (4 oz) can diced green chile peppers
  • 1 (1.25 oz) pkg taco seasoning mix

In a medium skillet, cook the ground beef until browned over medium heat.  Drain and set aside.

Place the ground beef and the remaining ingredients into the  slow cooker.  Mix to blend and cook on LOW for 8 hours.

Serve with shredded cheddar cheese, taco chips, and/or sour cream.

NOTE:  This recipe is not my own.  I can be found at here at allrecipes.


So Sorry for the Lapse…

Remember me?  I barely remember me!  I started this blog with the intention of posting on a regular basis…but we all know the where the Road of Good Intentions leads.  Anyway, I’m not going to make a lot of excuses.  I am going to attempt to be more diligent in my postings.

To catch you up…I have been doing a lot of home projects and writing tutorials for Hometalk.  You can visit my project page here.  I hope to share some of them with you on this blog.  Please feel free to follow me on that site.  I have recently been asked to provide tutorials via Skype – it’s a new program they are launching, in which customers can click on a link to purchase time with me (and other members of the Hometalk team) for one-on-one help with a project they are working on.

I am not baking and decorating cakes as much since returning to work full time last August.  That’s not to say I’ve stopped.  I have just slowed down.  I have been trying some new and old recipes and I will certainly be sharing those with you here at Nonnasense.

My grands are growing up quickly and I am enjoying time with them (although not nearly enough!).  They love baking with me and especially love when I open my craft room to them for special projects.  Right now my craft room is full of everything but crafts – a project I am hoping to tackle this weekend!

Well, enough about me.  I just wanted you to know that I am still around and will be dropping in a little more often now that I am a bit more settled.  I hope you will find something here that makes your life just a little bit better – even if only for a moment.

Lemon Curd? (ROFL)

Are there words or names of things that just make you want to giggle?  Or maybe they conjure up visions (pleasant or not).  Lemon Curd is one of those things that does it for me.  It makes me think of curdled milk or Little Miss Muffet.  What the heck is a curd anyway?! (I looked it up…click here for the definition)

I have used lemon curd in recipes before, but I don’t recall ever making it.  After doing some baking on Friday, I was left with four egg yolks and a few naked lemons (only needed the zest for a previous recipe).  I also had some blueberries in the fridge that were calling my name.  Now, before I go any further here, I have to confess…I have no photos to share. It was an incredibly busy weekend and frankly, I wasn’t planning on blogging about it.  But that darn lemon curd (snicker) was so delightful…

I decided to make blueberry lemon curd hand pies.  Well actually, I decided to make lemon curd and I needed something to do with it!  I searched the internet for recipes and found several that covered everything but I wanted the best recipe for each phase of the job.  Recipe #1:  Lemon Curd,  Recipe #2:  Blueberry Compote,  Recipe #3:  Pie Crust.

Even though there are no photos, I will share with you the links to the recipes and the notes I made along the way.  Some of their photos are better than mine anyway.

Let’s talk about the Curd (giggle).  When I was recovering from surgery a while back, I spent some quality time with one of the food channels where I met the Pioneer Woman.  I love her, so when I was faced with a million Google returns on my Lemon Curd search, I zeroed in on her blog post, How To Make Lemon Curd.

I was skeptical when I first started making it.  I didn’t see how egg yolks, sugar, and lemon juice were ever going to thicken up – and then adding all that butter just seemed counter-productive to the task.  But, I soldiered on and to my amazement, it worked! The. First. Time.  It’s amazing what being patient and following directions can do – neither of which are my best qualities.  This stuff is really basic in its ingredients and process but it does take a little time and attention.  Overall, it is fairly easy to do and a great way to use up egg yolks.  You will need eight of them, so if you save yours in the freezer, package them in fours or eights and be sure to mark your bag with the quantity and date.

The next component of my hand pies was the blueberry compote.  I make a blueberry sauce that I was tempted to use because it is so yummy, but not being much of a pie master, I decided to, once again, follow directions.  The recipe I used was found on the Vanilla & Bean blog.  It was nicely written and I just had a good feeling about it.  Click here to view it.

Now, if you wanted to, you could use this recipe as your “one-stop shop” because it covers everything from crust to curd (giggle).  I only followed the directions for the compote and I was satisfied with the results, but I can’t vouch for the entire recipe.  I found it interesting that one of the ingredients was maple syrup.  I did not have any pure maple syrup on hand so I used pancake syrup.  I wouldn’t advise it because it gives it a certain taste that I don’t think pure maple syrup would have.  I compensated for this by adding some cinnamon and a little vanilla (please don’t ask me how much because I often channel my Italian grandmother with “a little of this, and a little of that”).

After finishing up both of the pie fillings, I let them cool and then set in the refrigerator for a few hours.  Both thicken up nicely, but oh, that curd (heh, heh)!  It was like satin butter, if there was such a thing.

Lastly I made the pie crust.  This is not my forte.  If you know me, you know my story about my dad.  I learned to bake at his knee.  He could make everything, but we never made pies together.  He occasionally made pie crust but I was never included in the process – and frankly, as long as I got to eat the crust, I didn’t care.  He always made it seem like rocket science – what with needing the right temperature of water and butter and so on.  Rolling it out looked daunting, and of course he said it had to be just the right texture and thickness.  I’m more of an instant gratification kind of girl.  Pie crust was beyond my skills or interest.  Besides, Mrs. Smith made a crust that couldn’t be any more instantly gratifying!  Well, a few years after my dad passed, I decided to try making pie crust.  I’m embarrassed to say it took me so long to do it.  Easy peasy!  This is the recipe I use and it’s the one I will stick with until my dying day.  Sorry Dad, but it’s not rocket science!

I chilled the dough for about an hour before rolling out on a heavily floured surface.  I used my Pampered Chef Cut-n-Seal to cut out discs for my hand pies.  I made 32 discs for 18 pies.  I covered two baking sheets with parchment and laid out the  first 16 discs.  I spread each disc with a heaping teaspoon of lemon curd (tee hee) to within a half-inch of the edges.  I spread egg whites around the exposed dough. Next, I put a heaping tablespoon of blueberry compote over the curd (there, I said it without so much as a grin).  I rolled the remaining discs a little thinner so that they would overlap the bottom discs.  As I placed one over each base, I lightly pressed around the edges so that I could see the outline of the bottom disc.  Covering it with the Cut-n-Seal, I pressed down to crimp the edges firmly.  Finally, I made four slits in the top of each pie.

The trays went into the freezer.  Let’s put this step under “Notes”.  When you make a normal pie, it’s in a plate and therefore, sturdy to handle.  Hand pies do not have any kind of reinforcements and can become quite messy before they are baked.  I wanted firm pies to work with so I froze them for a few hours.  This can be done the night before or the day of baking.  If you do it the night before, be sure to take them from the tray once they are solid and place them in a bag to keep them from drying out in the freezer.

I took the pies out of the freezer and placed them on cookie sheets lined with non-stick foil.  I love that stuff!  I let them sit for a bit until thawed.  After an egg wash and a sprinkle of cinnamon and sugar, I popped them into the oven as directed in the recipe.  Keep an eye on these because mine baked quicker than expected and there was too much work that went into making them to let them burn up.

The pies cooled for about an hour before I plated them and went off to the covered dish gathering.  It was not the fastest treat I’ve ever made, but certainly one of the more satisfying.  AND, I have a new-found respect for CURD!


Helen’s Cake

Last summer, I was cleaning the basement of my old house.  My goal was to have everything in the house in its place or gone by the end of summer.  Goals can be lofty things…

2016-06-26 15.05.51

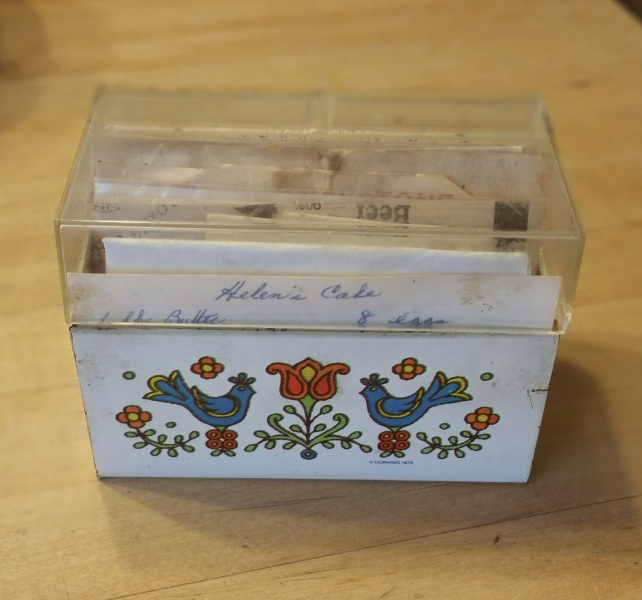
In my travels through boxes upon boxes of “stuff”, I came across my mother’s recipe box.  I set it aside for further inspection later that night.  Who am I kidding; it was the perfect excuse to stop the sorting and have some fun.

My mother spent the last ten years of her life afflicted with Alzheimer’s disease.  Her kitchen skills vanished slowly.  She went from cooking full meals with dessert to serving my dad a can of soup that hopefully she remembered to heat up.  She never claimed to love cooking or baking.  In fact she would proudly state the opposite.  She lost her mother at eighteen and never really had training in that department.  My grandmother, as I have been told over and over, was a kitchen wizard, an amazing seamstress, and a gracious hostess.  They say I took after her, but I never met the woman.  I think, perhaps, I have strived to be like her in an effort to connect with a grandmother I never knew but somehow loved.

My mother told me that when she married my father, she learned enough to get by in the kitchen, but she found no joy in it.  I imagine that my dad’s daily critiques (for her own good, of course) weren’t quite as helpful as he thought they would be.  My dad probably couldn’t contain himself, as he was a pretty good cook and quite the baker.  It was following him around the kitchen that instilled my love of baking.

Family 1965

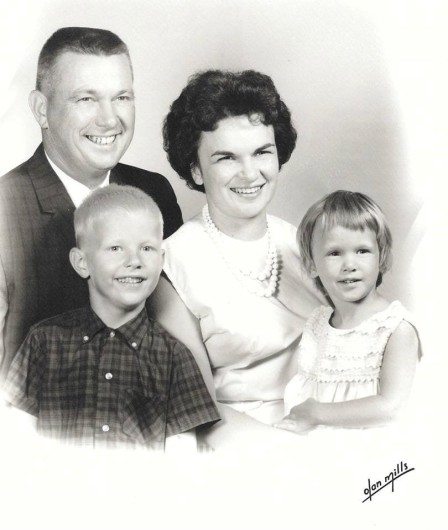
In looking back on this, I have to say that she sold herself short.  I don’t remember a bad meal.  Fancy, no.  Tasty, always.  And no one could touch her Blueberry Cobbler!  She worked full time and kept an immaculate home.  Her household expertise was in the laundry room…as an adult, I was still taking hard-to-get-out stains to her for her miraculous touch.  She loved it and basked in the glory of everyone’s praise.  I think, that’s it, you know?  We love to be recognized for what we do and I think we excel at the things that people take notice of early on.  I also think that we play down those things that we imagine aren’t worthy or that we have attached sorry memories to.  That’s unfortunate because in my mother’s case, it would have been amazing to see what she would have created in that kitchen on Grape Street.  I’m sure of it.

HELEN’S CAKE

I have no idea who Helen was.  I googled “Helen’s Cake” to see if it was an actual recipe, but it was not listed.  My guess is that Helen gave my mother the recipe for her cake.  This is funny because I can almost play out the scenario in my mind…

Mom:  Helen, this cake is delicious.
Helen:  Thanks Rita.  It’s such a simple recipe.
Mom: Oh, well you’ll have to give me the recipe sometime.
Helen:  I have it right here; it’s yours!
Mom:  Thank you.  I’ll be sure to make it soon.

2016-06-26 14.40.06

Now, for those of you that knew my mother, you already know that there are two key words tucked into this dialogue.  “Sometime” and “soon”.  Both imply that it will happen, but commit her in no way to baking in the near future.  She was polite, but I guarantee you she only took the recipe from her as a curtesy.  You can see by the hand copy (her beautiful cursive) that she didn’t even bother to get all of the directions down, nor did she even find out what the actual name of the cake was.  Gotta love that woman!

In an effort to make this cake and update the recipe as well, a few changes were made.  You will note that the recipe doesn’t specify creaming the sugar and butter or any order of adding ingredients.  It also calls for 20 minutes of beating the batter.  Really?  20 minutes?  This threw me off a bit.  I am a self-taught baker and I am aware that there are many, many things I’ve yet to learn – so back to Google to see about that.  Turns out, this is unnecessary.  The recipe predates the time when stand mixers were a common thing in the home.  So, can you imagine 20 minutes of beating by hand? UGH!

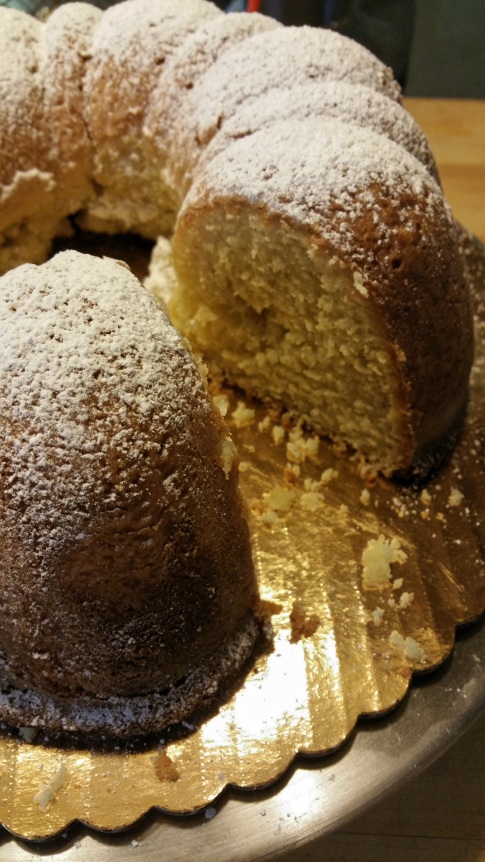
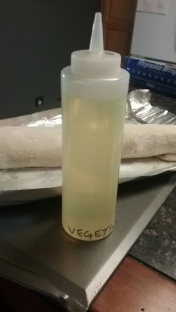
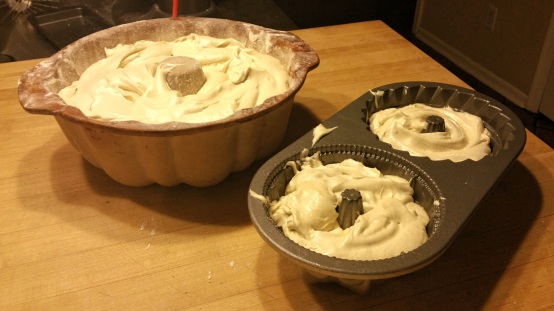
I am not sure what Helen’s Cake is supposed to look like.  I didn’t even know what type of pan to bake it in.  I chose to use a classic stoneware bundt pan.  There was too much batter for this so my second attempt will be in an aluminum tube pan.  I still have the one that my aunt gave my mom when she was a store clerk at Grant’s in Hammonton.  The recipe calls for vanilla and lemon extracts.  I used vanilla bean paste and orange extract, since this is what I had on hand.  The baking time was not specified so I baked it for an hour, checking it several times throughout the process.

2016-06-26 14.36.35

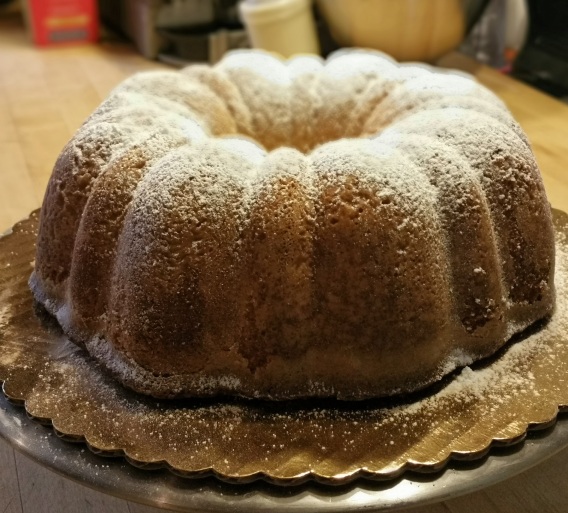
This is what we used to call “company cake”.  My aunts that lived next door always had a company cake on hand.  If no one visited (company), we got to eat it the next day.  Never something fancy, gooey, or overly sweet, but always made from scratch and just right for a midafternoon snack.  The texture is course and moist with the slightest crunch from the delicious crust.  It is heavier than a sponge cake, but not as dense as pound cake.  The only decoration is a light dusting of powdered sugar through a sifter.

Upon removing the cake from the oven, I was pleased on several levels.  First, it had a beautiful golden brown crust.  The portion of the cake at the top of the pan (eventually to become the bottom of the cake) was crusty and even.  This is by far my favorite part of the cake.  I usually eat a ring of crust around the center…it’s too good to resist (and when the cake is flipped, no one will notice!).  The cake released from the pan easily and unbroken.

2016-06-26 14.35.40

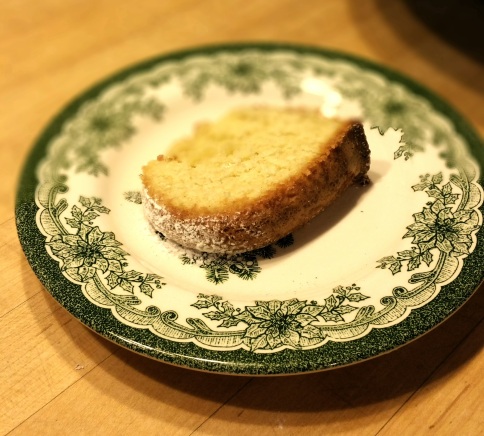
The slice removed from the cake did not disappoint.  The orange flavor was present, but mild.  The cake was dense and moist.  I’m not sure that I would change much about this other than experimenting with other flavors or adding a little orange zest to the batter. (Scroll down for the updated recipe)

My mother died almost three years ago.  The disease had taken her away from us long before that.  It had been difficult for me to connect with her since her passing.  Who knew that there would be a blessing for me waiting in her recipe box of all places!  I am looking forward to baking my way through all of the recipes that she had in there (even if she never did).

2016-06-26 14.41.13

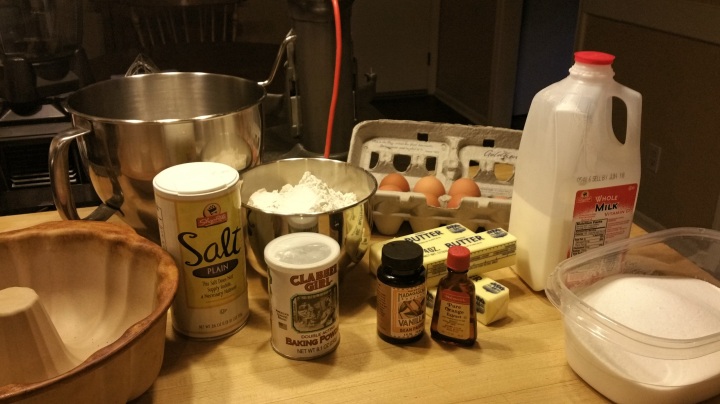
RECIPE:  Helen’s Cake

Ingredients:
1 lb butter
4 cups sugar
4 cups flour
4 tsp. baking powder
1 tsp. salt
8 eggs
1 cup milk
2 tsp. vanilla bean paste
2 tsp. orange extract

Preheat oven to 350 degrees.  Grease and flour bundt or tube pan.

Cream butter and sugar until light and fluffy (approx. 5 minutes).

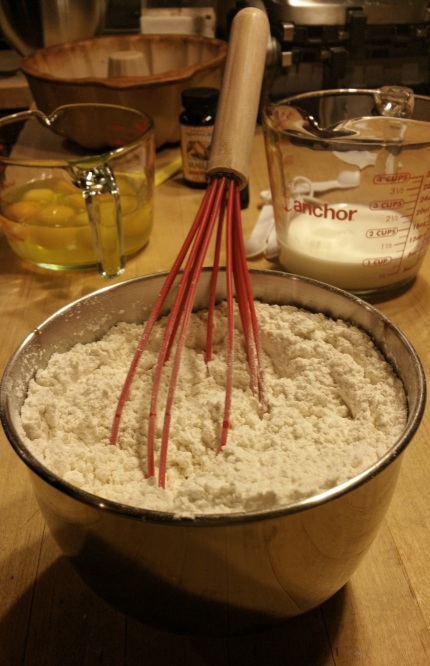
In a medium bowl, mix the flour, baking powder, and salt.  Mix with a whisk to thoroughly combine.  Set aside.

2016-06-26 14.39.22

Measure the milk and then add the vanilla bean paste and orange extract.  Set aside.

2016-06-26 14.38.50

Add eggs, one at a time, to the butter/sugar mixture, beating after each addition.  Beat at medium speed for 3 minutes.

Into the batter, add the flour mixture and milk mixture in portions – alternating dry and wet (ending with wet) while mixing on low speed.  Beat at medium speed for 3 minutes. Spoon batter into prepared cake pans.

2016-06-26 14.33.52

Bake 50-60 minutes, checking for doneness by inserting a knife or wooden skewer.  Do not overbake.

Allow cake to sit in pan outside of the oven for 10 minutes.  Invert onto cooling rack.

Dust with powdered sugar or glaze of choice.  Serve to company and think of Helen.  Or, just say you are going to bake it “soon”, and think of Rita.

2016-06-26 14.34.28

Refrigerator Clean-Out Stromboli

You can make Stromboli from just about any combination of foods providing there is cheese involved.  Now, I’m only half Italian and I’m not sure if I could be handed a pair of cement shoes for saying that or not.  This is just my observation based on what people have been willing to eat (and dare I say, enjoy) under the name “Stromboli” in my house.  Growing up, it was referred to as Pepperoni Bread because traditionally, in my family, pepperoni (and lots of it) was the meat of choice.  I not sure what kind of cheese my aunts used – I just knew it was good.  Also, we only got it on New Year’s Eve – making it that much tastier.

By the time I had a family of my own, we were calling it Stromboli and everyone had their own way of making it.  I used to be so intimidated because of the way people used to talk about their “process” of creating the loaf – like it was rocket science or something.  I didn’t attempt it for years.  I feel silly now, knowing that it is so easy and versatile…

I don’t have a recipe, and I am always trying new combinations for the filling.  This tutorial was made using what I had available in the refrigerator.  It’s a great way to use up leftovers and also to put a quick meal on the table during the week – trust me, no one will complain!

Supplies & Ingredients:

  • 1 lb of pizza dough (sold in bags (fresh or frozen) at Walmart, ShopRite, Aldi’s, etc.) I usually buy half a dozen bags when it is on sale and throw them in the freezer.  I take a bag out the night before I want to make the loaf and let it sit in the fridge until I’m ready.  Don’t get hung up on rising and temperature.
  • All-purpose flour – for dusting the work surface
  • Aluminum foil – to set the loaf on
  • Vegetable oil – for coating the loaf
  • Cooking spray – for coating the foil
  • Garlic powder – for flavor, of course!
  • Other spices – again, your choice
  • Large cookie sheet – preferably with sides
  • Wooden rolling pin
  • A nice, clean, flat surface to roll out your dough.
  • Sharp, serrated knife
  • Grated cheese
  • Cheese – I always use a combination of at least 2 cheeses, but it’s not a requirement. I think it adds some depth to the flavor, but that’s just my “process”.  I can’t tell you how much cheese you’ll need – enough for two layers to cover the dough when it is spread out.  If you are buying it, I’d purchase at least ½ lb.  You will see in the tutorial that I ran short on both types of cheeses but in the end, no one was the wiser.  Cheese is NECESSARY to bind the loaf together.
  • Meat – Pepperoni, salami, lunchmeat, quick steaks, roast beef, chicken, sausage, hamburger, and on and on… Think of your Stromboli like a big sub and throw in any combination that makes you happy.  Once again, I can’t tell you how much and don’t panic if you run low…improvise!  Meat is NOT a requirement.
  • Other Fillings – Veggies like onions, sautéed spinach, broccoli, asparagus, peppers, tomatoes, sauces, eggs – if you can lay it on the dough, then it’s all good.

A note about meats and other fillings…some things should be precooked before adding to the loaf.  Any meat that is raw falls into this category (quick steak, sausage, hamburger, etc.)  Any veggies that you want caramelized or sautéed should also be done prior to layering onto the dough.  Here is the important thing – after preparing ingredients like these, you must drain them thoroughly.  Too much grease or moisture in your Stromboli ingredients will prevent the dough from baking properly and make it very heavy (and kinda gross).

20170416_140942

Now that may seem like an extensive list, but trust me…you have most of it at your disposal.  Okay, here we go:

  1. Preheat the oven to 400 degrees
  2. Cover the cookie sheet with foil and spray with the cooking spray. If your sheet does not have sides, just turn up the sides of the foil so that any oil that seeps out of the loaf won’t spill all over your oven.20170416_142030
  3. Dust your rolling area with a liberal amount of all-purpose flour. Dust your rolling pin as well.20170416_141204
  1. Remove the dough from the bag and stretch it out a bit in your hands, forming a rectangle of sorts…don’t overthink this – you just want to get your shape started.

20170416_141304

  1. Begin rolling the dough into a rectangle (again, not perfect). The dough will stretch back and fight you for a bit, but keep at it.  You don’t want to leave the dough too thick or your loaf will be very bready (is that a word?).  You also don’t want it too thin or it will appear limp.  Your rectangle should be roughly 15”-18” side-to-side and 10”-12” front-to-back.  IT WILL BE VERY ROUND ON THE EDGES, which is why I am even hesitant to call it a rectangle.

20170416_141341

  1. Sprinkle the dough with garlic powder and/or any other spices that you like.

20170416_141440

  1. Grab your cheese and lay it out in a single layer over the dough. Leave about ½” along the side closest to you and the two outside edges.  Leave about an inch on the side furthest from you.  If you run out of one type of cheese, just grab another to finish.  This layer must cover the whole surface of the dough.

20170416_141630

  1. Next, add your meats and/or other fillings. If using any sauces or really wet ingredients, use them sparingly. You can always serve the loaf with sauces on the side for dipping.  Again, don’t fret about running out before the layer is done…just throw something else on there.

20170416_141705

20170416_141800

  1. Another cheese layer. If you don’t have enough, don’t give it a second thought.  You’ll see in the photo below that I only had enough provolone to cover half of the dough.20170416_141843
  2. A bit more meat or filling, but just in the center – not all the way to the edges.
  1. Now it is time to roll. Begin with the edge closest to you.  Fold it up and over the fillings.  Continue rolling, do not try to make it tight or loose – just allow it to roll onto itself without picking it up.

20170416_142100

  1. When you get to the last few inches, you will notice that the fillings are starting to move toward the edge (law of physics or something like that). Take the edge of the dough that is flat on the table and stretch it outward a bit so that the fillings don’t overflow.  You want to have at least a ½” of dough that is not covered.

20170416_142118

20170416_142140

20170416_142143

  1. Wet your finger (with water, not your mouth!) and run it along the remaining strip of dough. This will help seal the loaf.  Make the last roll of the loaf so that the seam is on the bottom.

20170416_142203

  1. On each end, grab the dough and stretch it out a bit and then fold it under. This keeps the loaf from leaking.

20170416_142213

20170416_142229

  1. Carefully transfer the loaf to the cookie sheet. You may need to sit it on there diagonally to fit the length.
  2. Now this is a bit messy. Take some vegetable oil and coat the outside of the loaf.  Be generous, but don’t saturate it.  I usually pour some in my hands and give it a good once-over.

20170416_142323

  1. You can sprinkle grated cheese and/or more garlic or spices over the loaf. Don’t put too much or it may take on a burned appearance.
  2. With a sharp serrated knife, cut slits (just through the dough) every ¾” or so. This allows it to bake evenly and also scores the loaf for easier cutting.

20170416_142456

  1. Bake it for approximately 20-25 minutes, until golden and bubbly. Remove the loaf from the foil onto a clean cutting board.20170416_151731
  2. Allow the loaf to sit for about 5-10 minutes before cutting with the serrated knife and serving. Mangia!

20170408_190540

The possibilities are endless…cheesesteak with fried onions, sausage & peppers, cheeseburger, breakfast Stromboli, veggie Stromboli, you get the idea!